Tuesday, 16 January 2024

Saturday, 16 December 2023

Blender add/remove blank frame


The following is roughly what I obtained after communicating back and forth with ChatGPT for about an hour. It's a new animation functionality plugin that allows for convenient addition or removal of "blank frames" between keyframes. Let's take a look at the effect.

https://youtu.be/4FL3Wb2bpNk


Actually, I searched online several times. Either someone asked the same question without an answer, or it was an explanation of inserting keyframes. Today, after checking again, I found that Blender Grease Pencil seems to have a similar function (https://docs.blender.org/manual/en/latest/grease_pencil/animation/tools.html). However, after testing, it still adds a keyframe. The difference is that when used on a frame with an existing keyframe, it moves the subsequent keyframes back by one frame. Sometimes it doesn't work, but that's not important.

What's important is why the animation in pose mode doesn't have this keyframe editing function!!!?? It's so useful (tilts head).


這次要跟大家分享的是我大約花了約一個小時

跟ChatGPT來回溝通後得到的一個動畫功能插件

那就是可以很方便的在關鍵格之間加入或移除”空白格”

來看看效果

https://youtu.be/4FL3Wb2bpNk


其實我上網找了好幾次

一樣是有人問,但沒有答案,不然就是insert keyframe的說明

今天又查了一次,發現Blender Grease Pencil似乎有類似的功能

https://docs.blender.org/manual/en/latest/grease_pencil/animation/tools.html

但是測試了之後,是也是新增key frame, 

差異是在已有keyframe的畫格上使用,會把後的keyframe 往後移一格。

但有時又試不出來

好這個不重要


重要的是

為什麼pose mode的 animation 沒有這種關鍵格編輯功能!!!???

明明就很好用啊(歪頭)


Tuesday, 21 November 2023

Using Namespace in Blender

Blender is indeed very clever! 
For users familiar with Maya and MotionBuilder(MoBu), namespaces are an essential tool for naming conventions.
 In my recent search for information on namespaces, I discovered that others have encountered similar issues. 
However, the answers provided did not quite address what I was looking for.
For example:
https://blenderartists.org/t/apending-and-namespaces/1305794
https://blender.stackexchange.com/questions/279191/namespacing-imported-assets

After conducting two consecutive tests, I stumbled upon the solution. 
First, let's understand the purpose of namespaces. In my understanding and experience of using them, they allow for the reuse of the same naming and hierarchical structure in a scene without modifying the original names.


1. Blender allows direct naming using prefixes sperate by colons. However, Blender doesn't explicitly present this concept and usage. Its habitual approach to handling duplicate names is to use a "dot" followed by a "three-digit serial number." 

2. As long as the group name of the skin model matches the namespace, when exporting the skin mesh using FBX, Blender automatically removes the name before the colon. Isn't that clever! 

3. However, if you export only the animations in FBX, it will still include the namespace. Nevertheless, this doesn't affect importing the animations into Unreal Engine, so it's perfectly fine! Note: When importing into MoBu, the namespace will still be present, possibly due to version differences in reading exported FBX files. 

I'm new to Blender, so feel free to leave comments if I make any mistakes.

Blend真的是很聰明! 對於maya跟motion builder的使用者來說 namesapce是個很重要用來規範命名的工具 這幾天在查找namesapce的相關資訊 發現有人有跟我一樣的問題 但是回答的都不算是我想找的解答 
像是:
https://blenderartists.org/t/apending-and-namespaces/1305794
https://blender.stackexchange.com/questions/279191/namespacing-imported-assets

連續兩測試後,誤打誤撞的發現解答 先理解一下ns的用途,在我的理解及使用的經驗中,它是為了能使用同樣的命名及層級結構,能在同一場景中重覆使用,但又不需改動原始名稱。 


1. blender是可以直接用前綴名加上冒號命名,只是在blender裡,並沒有特別提出這樣的概念與用法。它對於重覆名稱的慣性處理方式是用"點"再加"三位數序號"。 
2. 只要skin的模型群組名稱與,ns一樣,在用FBX輸出Skin Mesh時,它會自動的把冒號前的名稱自動刪除,是不是很聰明!!! 
3. 然而若FBX只輸出動作,它還是會帶冒號前的ns,不過這不影響動作滙入到UE裡,所以是很OK的! 註: 但若滙到mobu裡,ns還是會在喲,可能是mobu在讀取輸出FBX的版本差異。

對於Blender我才剛起步,若有任何資訊上的錯誤,歡迎留言糾正我。

Tuesday, 24 May 2022

Animation Exercise 02


Reference:

https://www.youtube.com/watch?v=tGh4AAz32vw

https://twitter.com/i/status/1523489023234166784

This is a great movement too! Since this movement is more complicate. I am going to separate it into two parts.

Working progress:
    Key pose collecting: 30 mins
    Idle pose: 15 mins
    key pose block: 90mins hours
    

    timing adjust: 20 mins
    

    spine: about 60 mins

    Total working time : 3.6 hours

Reference:

Reference: https://www.youtube.com/watch?v=tGh4AAz32vw


Tuesday, 10 May 2022

Animation Exercise 01

It is time back to key-frame animation!

This animation took me 3 hours to finish it. If it was mocap data, I can probably clean it up within a half hour.


Rig: Mannequin + HIK

working time:

idle pose: 20 mins
key pose: 50 minis
spine: 50 mins
polish: 60 mins

total: 3 hours


Check out their awesome motion!

Reference: https://twitter.com/i/status/1523636617872764928


Thursday, 21 April 2022

Python 命名規則

 Python 在工作上幫了我很多,不斷的累積後,也進入了思考怎麼樣才是好的命名的階段

在參考了各方大大的分享文章,以及自己使用Maya及Motionbuilder的經驗

確實各家有不同的命名規範:

以下是我自己覺得適合的命名模組

雖然有些知識還有些模糊,但過一陣子再檢視看看,有什麼可以改進的


Krita python export png per layer


寫這個工具是因為專案上有需要批次輸出圖層檔案
因為Krita 免費,又可以用Python撰寫
花了一些時間找了一些教學
總總約花了半天,寫出這樣的工具。

執行位置: 工具>指令稿>指令稿工具


基本用途:
依開始的圖檔位置,自動建立一個存放輸出圖片的資料夾,並依圖層名層為檔案名稱。
目前每處理一個圖層都要按一次確定,因為管方文件好像有問題無法使用,所以也不確定要如何解決,但比起要手動一張一張輸出圖片,還是要方便跟輕鬆多了吧。

Python code: 下載位置

 '''  
 @Jiapei Lu 2022  
 This tool is to export png per layer with baselayer, and make a folder for store all those exported pics.  
 It applys the name of the layer as a filename automatically.  
 Exported folder will be created under where the opened file is.  
 '''  
 from krita import *  
 import os  
 export_png_folder_name = 'export_png' # you can change the folder name here.  
 #Krita.instance().action('python_scripter').trigger()  
 doc = Krita.instance().activeDocument()#access to current file  
 doc_dir = os.path.dirname( doc.fileName( ))#get the file path  
 exportDir = os.path.join( doc_dir, export_png_folder_name)# building the path for exporting  
 #If folder doesn't exist then create the folder for export pics  
 if not os.path.isdir( exportDir):  
   os.makedirs( exportDir)  
 batchNodes = []#this for containing all the layer nodes  
 #First: Go over all layer turn off it's visible except basic layer.  
 for node in doc.topLevelNodes()[ 1:] :  
     node.setVisible( 0)   
     batchNodes.append( node )  
 #Second: Trun on the visible of the layers one by one then exporting it.  
 for node in batchNodes:  
   node.setVisible( 1)  
   doc.refreshProjection() #This is supper imported to refresh view. Otherwise the exported pic could be wrong.  
   info = InfoObject()# InfoObject is a dictionary with specific export options  
   info.setProperty( "alpha", True)  
   info.setProperty( "compression", 9)  
   info.setProperty( "forceSRGB", False)  
   info.setProperty( "indexed", False)  
   info.setProperty( "interlaced", False)  
   info.setProperty( "saveSRGBProfile", False)  
   info.setProperty( "transparencyFillcolor", [0,0,0])     
   path = os.path.join(exportDir, node.name() + ".png")  
   #node.save(path, doc.resolution(), doc.resolution(), info)  
   doc.setActiveNode( node)  
   doc.exportImage( path, info)    
   node.setVisible( 0)  
   doc.refreshProjection( )   
 Application.setBatchmode( False)  
 QMessageBox.information( Application.activeWindow().qwindow(), "Done and Done", "All done!")  

2022 Animation Demo


Porject: 《Marvel's Avengers Game
Response for : 
    Kate/ Black Panther Gameplay Animations.
    Clean-up Character Body Mocap Aniamtions.
    Building up the animation tool.
    Tranning Animators to meeting the AAA Game Quality.

https://vimeo.com/697820338

JiapeiShowcase_2022.mp4 from Jiapei Lu on Vimeo.


Python2.X json.load() unicode utf-8 Issue ( Sloved )


發生問題:

在mobu 2020利用os 連接路徑報錯,發現以Json.load()的字典格式,為unicode

而mobu無法辨識,需先將用到字串利用string.encode('utf-8')

才能使用

後來想想覺得應是在open()時,就可以先轉換,就不用對個案一個一個轉換

在網路查了相關的關鍵字"python2.x,  json.load, dict, unicode, utf-8, open"

試了多個覺得可行的方式

像是open加入encoding

或是json.dump()加入encoding

import io

都沒什麼用

最後找到這個解最簡單,原網址https://www.jianshu.com/p/90ecc5987a18


Python2.x Code Sample:

 def Read_Dict_Data( Dict_Data ):  
   import json  
   def byteify(input, encoding='utf-8'):  
     if isinstance(input, dict):  
       return {byteify(key): byteify(value) for key, value in input.iteritems()}  
     elif isinstance(input, list):  
       return [byteify(element) for element in input]  
     elif isinstance(input, unicode):  
       return input.encode(encoding)  
     else:  
       return input  
   with open ( Dict_Data )as f:  
     data = json.load(f, encoding = 'UTF-8')# it is useless adding encoding when use json.load()  
     return byteify(data)  

如果是Python3就沒有以上問題

多數網頁都沒清楚的說明python2與3的差別,所以記錄一下

Thursday, 23 December 2021

MotionBuilder T pose Script

Tpose Tool Story:

Do you fell it is annoyed to pose a t-pose when do HIK setup? If you do, Try this tool which can rotate selected bones to vertical or horizontal angle depending on its origal angle.

You can download the tool from HERE

Demo Video


工具介紹

如果你跟我一樣在設定Tpose時,覺得手動調很煩,可以試試這個小工具

選擇要水平或垂直的骨骼,執行工具,就會自動判定接近的角度。

以影片的角色為例,因為上手臂較接近垂直線,所以先手動調整到接近水平後

再執行工具,就可以快速得到對的角度!


Thursday, 4 November 2021

Maya 2022 Python 2to3 無痛轉移

 Maya 2022 已改用python3 很多工具都需要轉換

找了幾個方案
Python 2to3 無痛轉移 https://www.pythonf.cn/read/38276
重點
2. 在2to3.py的文件資料下,shift+右鍵打開命令視窗
通常位置"C:\Python27\Tools\Scripts"
3. 在命令視窗輸入指令轉換
- 轉換並覆寫檔案,保留.bak的備份
python 2to3.py -w D:\test.py
- 轉換並覆寫檔案不備份
python 2to3.py -w -n D:\test.py
- 批量轉換
python 2to3.py D:\
已知手動修改部分
reload在python3要另呼叫載入
from imp import reload

Thursday, 20 August 2020

Maya : Vertex match tool

This tool is for matching vertex position and normal from Act vertex to Ref vertex.

It needs numpy. 
To install numpy, navigate to maya app directory (which looks like “C:\Program Files\Autodesk\Maya2023\bin”)

inside folder shift and right click mouse. choose open power shell cmd prompt, type 

mayapy.exe -m pip install ‐‐user numpy

or

.\mayapy.exe -m pip install ‐‐user numpy

Click Download 

Usage: 

import vtxMatch

from importlib import reload

reload(vtxMatch)


Tuesday, 11 June 2019

2017 Animation Demo

Porject: HTC Vive《FRONT DEFENSE》
Response for : 
    Character Body/ Facial Rig
    Cinemate animation

Tuesday, 14 June 2016

2015 DemoReel

Body/ Facial Rigging and Animation


Friday, 20 May 2016

Motion Builder 教學


希望以每週最少一部錄制教學,完成MotionBuilder教學。
以下內容是以前設定過的課程大綱,會依錄製情況做調整。

  • Lesson 1 :介面認識

  • T移動 R旋轉 S縮放
  • Shift+Left Click 平移畫面
  • Ctrl+Shift Left Click 旋轉畫面
  • Ctrl+Left Click 縮放畫面
  • Ctrl+a 物件置中
  • Ctrl+1~4 切面視窗面版
  • Ctrl+W 樹枝圖
  • Ctrl+E 透視攝影機
  • Ctrl+F 前視/後視
  • Ctrl+R 右視/左視
  • Ctrl+T 上視/下視
  • Alt+z/y 回復視窗操作
Preferences參數設定 saving/selective redraw/undo/Viewer
Asset browser
Navigator window
Layouts 自定面版
Transport Controls


  • Lesson 3 : Advanced Characterize 進階角色綁定
    • Degrees of freedom ( DOF )
    • DOF 完整說明
    • Characters extension
    • Create Auxiliary/effectors objects
    • NameSpace
    • Handles
    • Constraints 的使用
      • parent/Child constraint
      • 3 Points constraint
      • Aim constraint
      • Position constraint
      • rotation constraint
      • relations constraints
      • Relation
---------------------------------------
Damping operator
new scene
create a cube
copies 5 (ctrl+c then ctrl+v 5 times)
ctrl+w
p (parent mode)

add 10 damping operator
Other>Damping(3D)

damping effecter
Number>integer
click all damping factor connect to integer


drag all cube into relation constrain


  • Lesson 5: 動作進階 mocap clean 
    • Filters的運用 key reducing/ peak Removal/ smooth/ smooth Translation
    • FCurves的運用 layer/ Time Warp (Ghost) (Tangent)
    • Key controls
    • pose的運用 copy/past pose
    • Motion Trajectories
    • time and timelines 的運用 takes mark/loop
    • motion blend window
    • story
    • Mirror
    • In place
  • Lesson 6: re-target
  • Lesson 7:Setup an Actor
Add Favorite path in Asset Browser
Open 2_1_Opt_Data.fbx from Asset Browser
Create an Actor from Asset Browser
Align Actor to Markers
縮放Actro Body對齊肩膀高度
調整手臂的角度
調整腿的角度
  • Create a Marker set
    • 頭部
    • 胸部
    • 腹部
    • 膝蓋
    • 腳掌
    • 肩膀
    • 手肘
    • 手掌

  • Rigid Bodies
    • 頭部
    • 胸部
    • 腹部
    • 大腿
    • 腳掌
    • 上手臂
    • 手掌

Optical_Correction
Eliminating Noise
frame 255
select RSHO 5

Zoom in to see peaks in the optical data.
M-drag the Split line
Select Auto-Bezier
Eliminating Occlusion
frame 296
Eliminating Swapping
Frame427
Finalizing Optical Data
Save file as : ActorMove

  • Lesson 7 :Mapping Actor to a Character
  • 環境設定 
    • Preferences / selective Redraw
    • Layouts 進階設定
    • cameras 設定 camera Settings/ add new Camera/ Camera Switcher
    • Lights 設定
    • Shaders 設定
    • Surfaces 設定

HumanIK - setup tip : Degrees of Freedom


     Setup Degrees of Freedom before you apply Human IK onto your rig!

     HumanIK system is come from Montion Builder. It usually use in motion capture. Today, I want to talk about Degrees of Freedom. As an animator, if you had a chance to use HIK, and also pay attention to the rotation of elbow, knee, ect... It is obviously to found out the elbow control has three rotation value which annoyed animators a lot.

     To avoid this problem. In Maya, select the elbow/knee joints, then start check out the option on Attribute/ Limit Information/ Rotate.


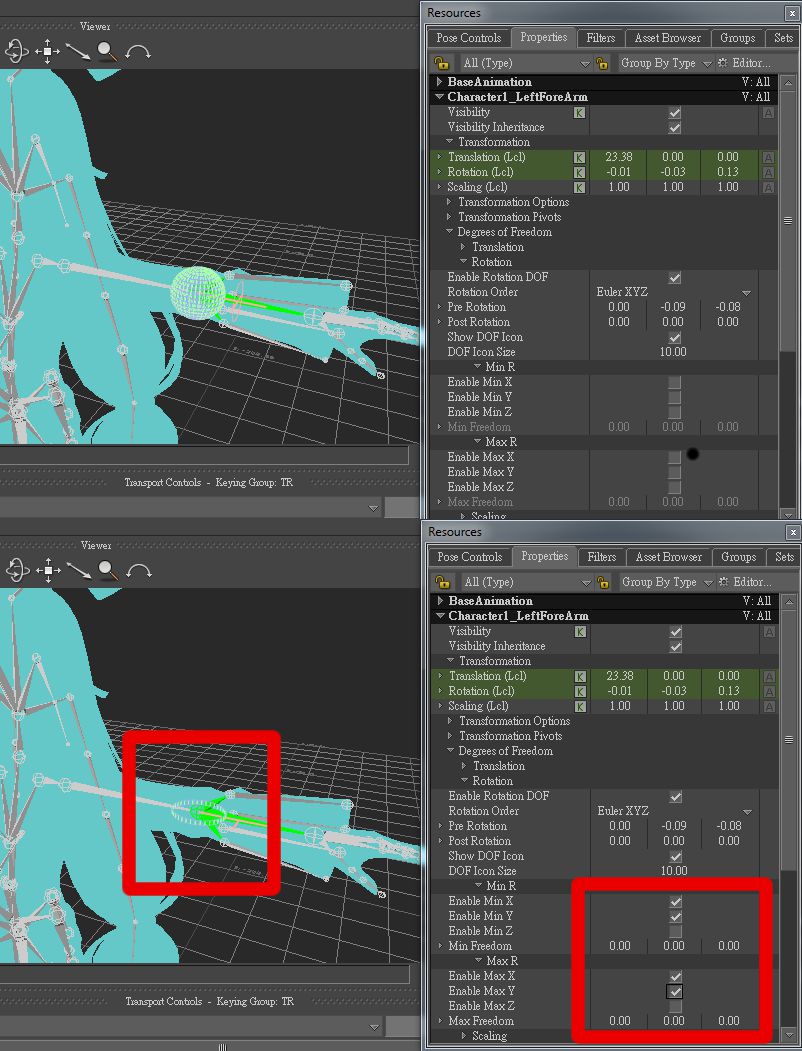
In moition builder, go to properties panel. switch the filter to All(type). the Degrees of Freedom should be listed on the panel.

Notice! This setting could only apply on skeleton not HIK.

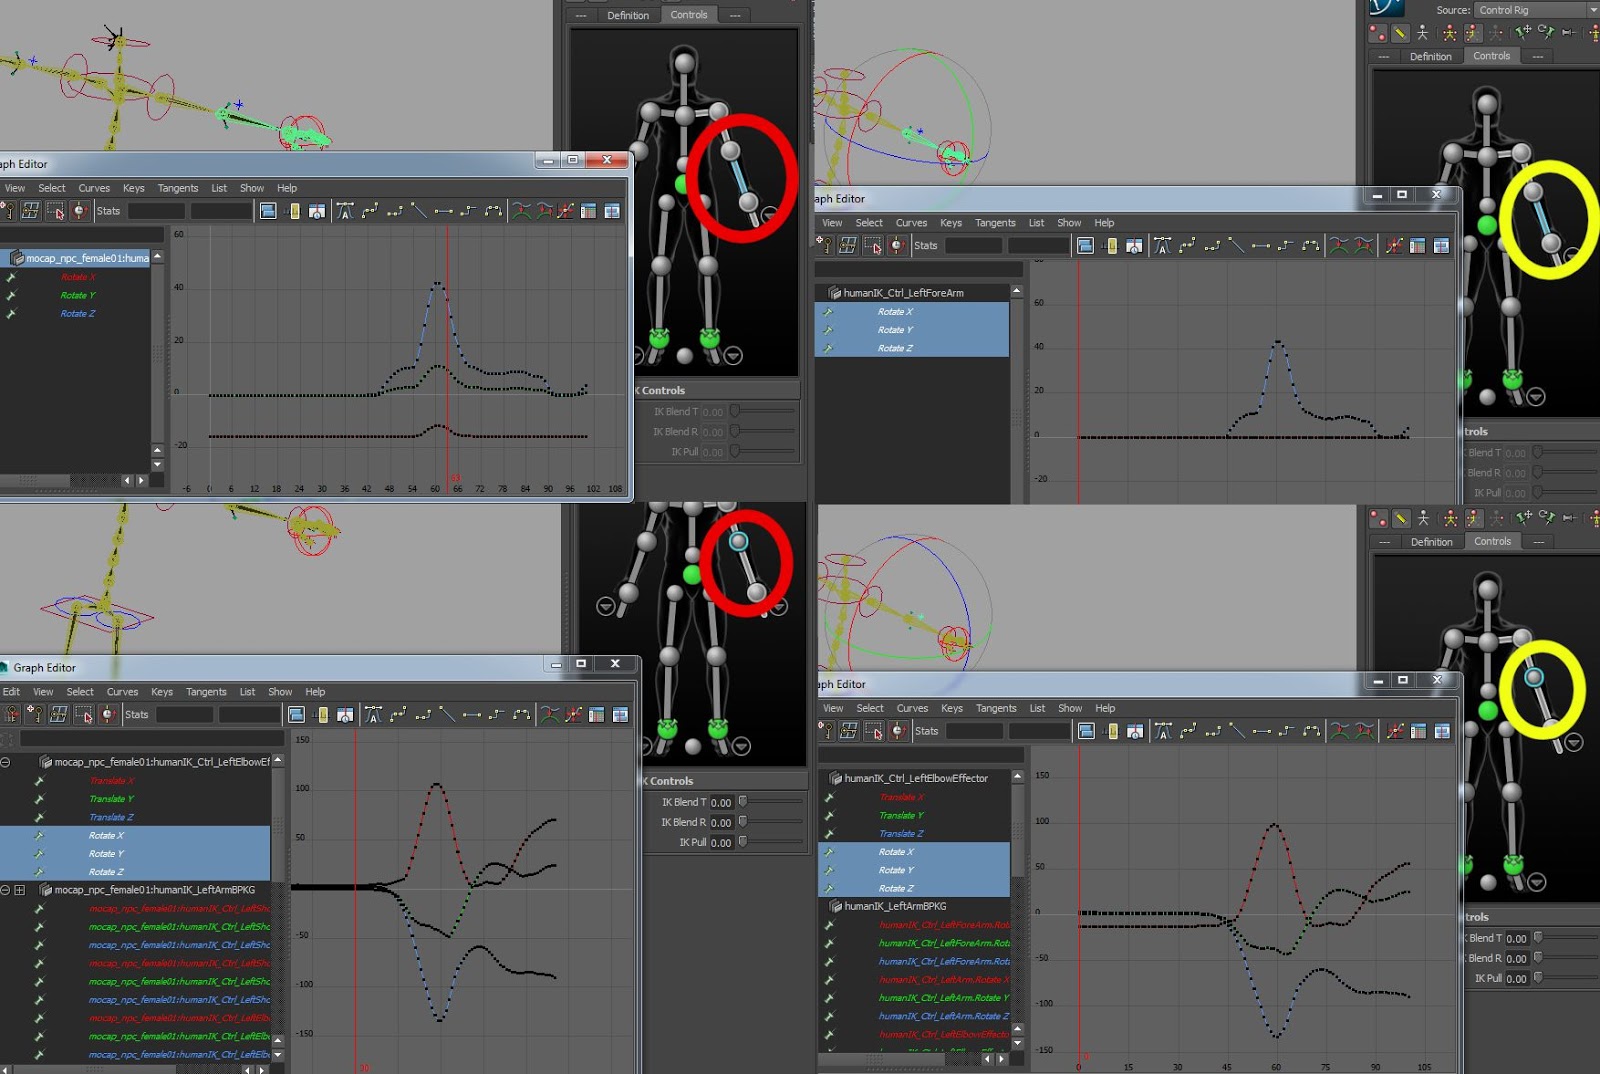
Let's take a look curves on this picture
Left side with red circle shows the result without DOF.
Right side with yellow circle shows the result with DOF.
The biggest different is Forearm FK controller.


I will discuss T-Pose next time.
========================== 中文版 ==================================
     在套用Human IK到骨骼之前, 先設定Degrees of Freedom!
 
     HumanIK是來自Montion Builder的控制器系統,最常被運用的地方應該就是motion capture。今天為什麼我講講Degrees of Freedom,身為一個動畫師,如果你有用過HumanIK,是有過什麼手肘、膝蓋等關節處,旋轉值不會只有一個,而是x、y、z都有。正常用IK Solver不會有這種問題,設定FK時也會限制旋轉軸向,而這些動作也是可以在HumanIK上設定的,但卻一直沒人去重視這個部分,實在很讓人頭痛。

避免這個問題,一開始在設定骨骼時,在maya裡只要針對手肘、跟膝蓋去勾選Attribute/ Limit Information/ Rotate下的最小跟最大值,就可以減少動畫師在調整手肘跟膝蓋時的麻煩。


而在motion builder 裡則是稱作Degrees of Freedom(DOF),在Properties裡先將顯示改成All(Type)就可以看到Degrees of Freedom的項目


只要在骨骼上設定好,HIK基本上就會依照骨骼的限制產生對的值,也就只會有一個旋軸的值。如果不做這個設定,當mocap的動作一套用上去,那HIK就會很"自由"的調動3個旋轉軸向。

看一下這張範列圖的曲線

右邊有紅圈的沒設置DOF
左邊有黃圈的是有設置DOF
最大的差別在前手臂的FK曲線


下次再談談T-Pose


Thursday, 16 July 2015

Maya animation export fbx command


For exporting animation.
There should add few lines to setting the fbxExport option before file command.

FBXExportBakeComplexAnimation -v true;
FBXExportBakeComplexEnd -v `playbackOptions -q -max`;
FBXExportBakeComplexStart -v `playbackOptions -q -min`;
FBXExportBakeResampleAll -v true

see FBXExport for more infomation:

code sample:
    mel.eval("FBXExportInputConnections -v false ;FBXExportBakeComplexAnimation -v true; FBXExportBakeComplexEnd -v `playbackOptions -q -max`;FBXExportBakeComplexStart -v `playbackOptions -q -min`;FBXExportBakeResampleAll -v true" )
    cmds.file( os.path.join( exportingPath,filename ) , force=True, options ="v=0;" ,typ="FBX export" ,pr =True, es= True )


I've tried to add those command into file - options flag. but it looks like doesn't work for the time range. That's why I put them before use file command.

Tuesday, 7 April 2015

Home work!

I am thinking to animate a set of character animations for Game in game engine like Unity or UE. Since I've been working in game industry for a decade. But all my works belongs to company or client. Right now more and more people develop their own games. This might be another way to contribute my work.

I already have some list of animation for like MMORPG.

The basic animation set will be :

  1. idle
  2. walk
  3. run
  4. physic attack
  5. magic attack
  6. damaged
  7. death
The pro animation set could be:
  1. idle
  2. idle-engage
  3. idle-tired
  4. idle-lookAround
  5. walk-4 directions
  6. run - 4 directions
  7. normal attack
  8. heavy attack
  9. special skill attack
  10. magic attack
  11. small damage
  12. big damage
  13. death
The emotion set
  1. happy
  2. cry
  3. talk
  4. wave
  5. nod
  6. no
  7. no idea
  8. thinking
  9. knee
  10. lets go
  11. okay
  12. thumb-up
  13. dance
  14. clap
  15. cheer
I will learn and use blender for this work. Hope it won't take too much time to learn. I am not going to publish is message until the basic animation set be finihsed.
Feel free to let me know if you have any idea or you want to join me.

Friday, 27 March 2015

Free 2D software KRITA


https://krita.org/download/krita-desktop/


中文介紹
http://www.playpcesor.com/2015/02/krita-photoshop-painter.html


Saturday, 9 August 2014

Script: Mirror pose in maya

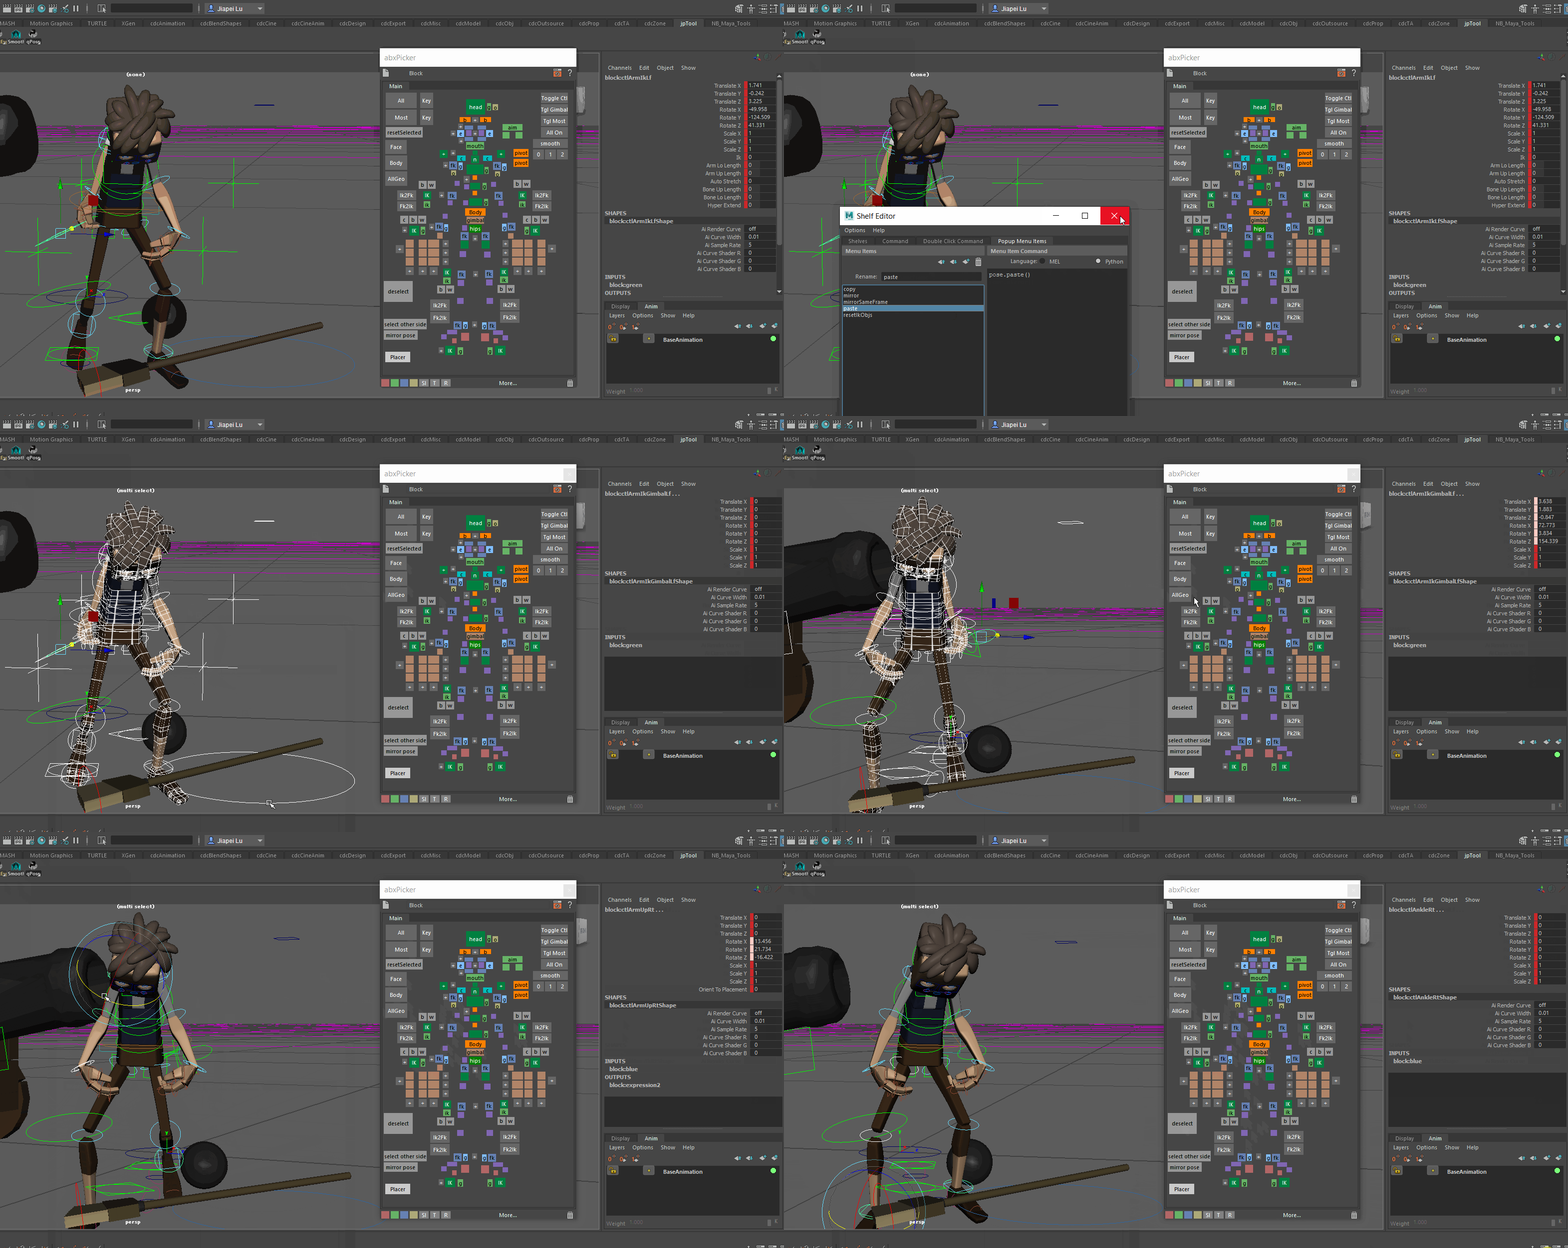
This is a simple script for mirror pose ( X to -X, or -X to X )


download: pose


More sample video:
https://youtu.be/41ZaP04D0Cc
https://youtu.be/Coo0G3MXXJ8

Put the file under "Documents\maya\scripts"
usage:
import jp_poseModule as pose
reload(pose)

# you can use those command to change attrs Positive and negative to fit the rig axis.
pose.updateMirrorVector( "normalAttrs", -1,1,1,1,1,1 )
pose.updateMirrorVector( "ikAttrs", -1,1,1,1,1,-1 )
pose.updateMirrorVector( "centerAttrs", -1,1,1,1,-1,-1 )


pose.resetIkObjs() # setting ik ctrls by selecting controls and run this function.
pose.resetPoleVectorObjs()# setting poleVector ctrls by selecting controls and run this function.

for AnimShcool's Rig
pose.updateMirrorVector( "ikAttrs", -1,1,1,1,-1,-1 )


pose.copy() # store one farme value for selection

pose.mirror() # paste mirror value base on pose.copy()

pose.paste() # paste value to original object base on pose.copy()

To find out the mirror side. the script support side pattern below:
RIGHT; LEFT
RT; LF
_R_;  _L_
Right; Left,
Rt; Lf'
_r_; _l_


配合poseLib使用,以彌補貼上pose的不足